Power on and kick start the scooter. After the vehicle speed is ≥ 4 km/h, get on the scooter and slowly press the thumb throttle. You can now accelerate using the normal method. When the vehicle speed is < 4 km/h, you won’t be able to use the thumb throttle to speed up. When riding the vehicle, make sure to wear protective gear such as a helmet, wrist guards, knee pads, etc.
The scooter can handle a maximum weight of up to 120 kg. To avoid accidents, we do not recommend people above 120 kg to ride the kick scooter. The rider should meet the age of the legal majority, be in good health, and have learned about scooter riding.
Although the kick scooter's design is waterproof and skid proof, we don't recommend riding it on rainy days or slippery roads for the rider's safety.
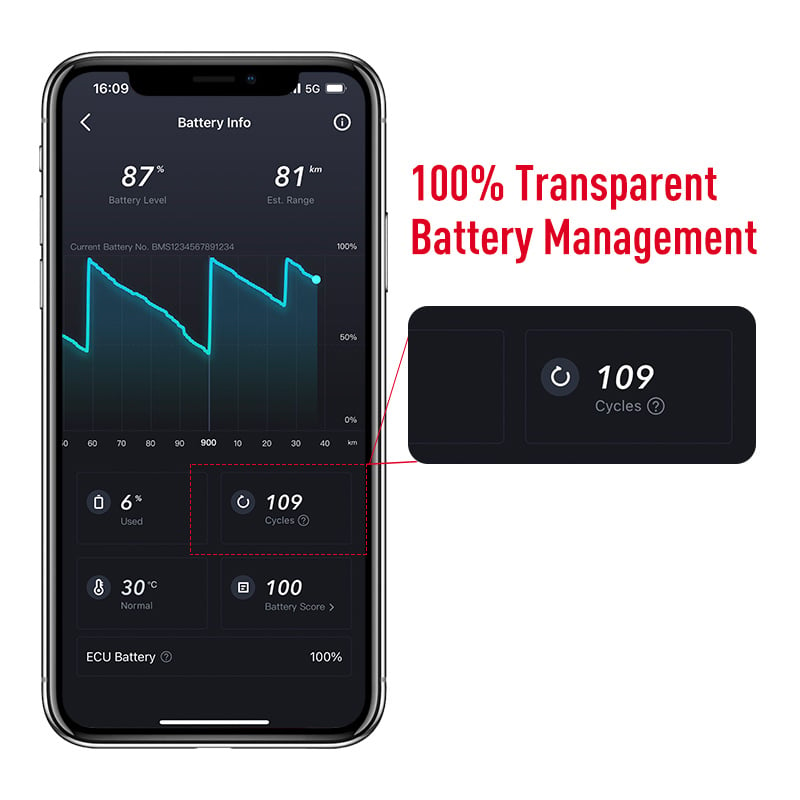
The NIU kick scooter battery can undergo 500 cycles of charging and discharging under normal working temperatures (0-45 °C for charging and -15-60 °C for discharging).
The total steering angle to the left and the right of the front wheel is 110°.
Please refer to the user manual for detailed warranty policies for the kick scooter and its parts.
The kick scooter has a non-removable battery. If you encounter any problems with the battery, please contact after-sales service for repair.
It can tolerate 3,000 folds under normal use conditions but may be damaged by a single violent use.
If there are scratches on your kick scooter upon unpacking it, you can contact the after-sales service. The scratches will be repaired under warranty. The warranty will be confirmed after investigating the case.If your kick scooter has scratches after having used it, you can contact the after-sales service for repair. This won’t be covered by a warranty.
In case you need spare tires or your tires get punctured, you can buy the extra tires. Please fill out this form and our after-sales team will get in touch with you with the instructions. We can send the tires to you. Then you can install it by yourself, or have it serviced in the workshop. Or you can send the whole kick scooter to us and we will install it for you with a charge.
Getting the right tire pressure for your kick scooter is important. It is not only the tire that supports the weight of your kick scooter but also the air pressure inside the tire. Tire pressure influences your vehicle performance like driving comfort and general handling behavior. The type pressure for your kick scooter is 45-50 psi or 3.10 - 3.44 bar. You can also see this information in your user manual. It's best to check your tire pressure every month.
A good battery is the most essential feature in any electric mobility vehicle or device. That's why NIU offers a 2-year Battery Life warranty, although it should be more like 3 years before you'll really notice a difference. Let's break it down - All NIU kick scooter batteries are thoroughly tested to ensure you'll reach 500 charging cycles before a noticeable difference in your daily use. If we take the KQi3 Pro as an example, we can see that with a range of 30 miles, a daily commute of ~5 miles, and you charge it every 3 days, then 500 charging cycles can last 1500 days - 4 years! In the NIU app, you can easily find all the information about your battery and charging cycles, a useful and transparent feature not provided by any other manufacturers.
There are several riding modes that you can use for your KQi scooter. The 4 modes are E-Save / Sport / Custom / Pedestrian. You can find this in your user manual. After a long press of the power button to turn on (or off) the device, short press once for the gear switch. Here is the video of how you can switch to different riding modes.E-save mode has a riding speed of up to 15 km/h for your KQi kick scooter. You will need to bind your scooter to the app and activate it by completing the tutorial. Only after this that you can switch to sport mode and get the maximum speed of your kick scooter.
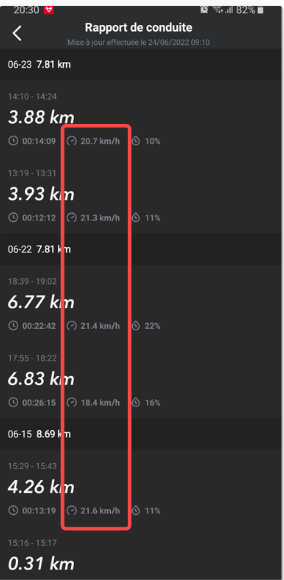
There are instances when you'll wonder why your speed on the controller/ dashboard is different than what is shown in your NIU App.Your dashboard may show you 20 km/h (DE version) or 25 km/h (EU version). However, the NIU app is showing a different speed.The speed shown in the app is the average speed, not the maximum speed.
YES. It is normal that the charger gets hot when charging the battery.The charger dissipates heat through the heat conduction of the shell. The charger has been tested at high temperatures. Even if the charger is placed in a high-temperature oven, it can work normally.
You can find the NIU App in the App store on your smartphone. The App supports iOS 10.0 and above and Android 5.0 and above, and Bluetooth 4.0 and above.
Introduction
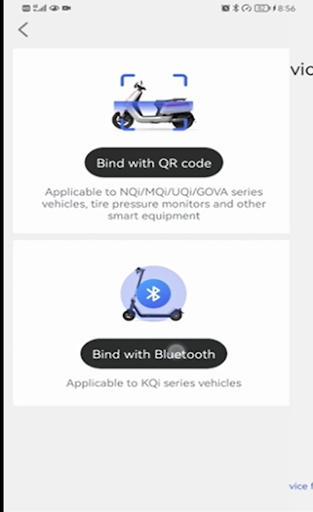
One of the best features that kick scooters have is the power to connect your KQi3 to your smartphone. With the NIU App, you can lock the KQi3 with peace of mind, check your riding statistics, or even customize your speed for a truly smart solution.The App and the kick scooters are connected via Bluetooth. When turning the scooter on, the Bluetooth indicator will flash.
Solution
Open the NIU App on your smartphone, register, and follow these steps:
1. Select Me from the App
2. Look for Device Binding
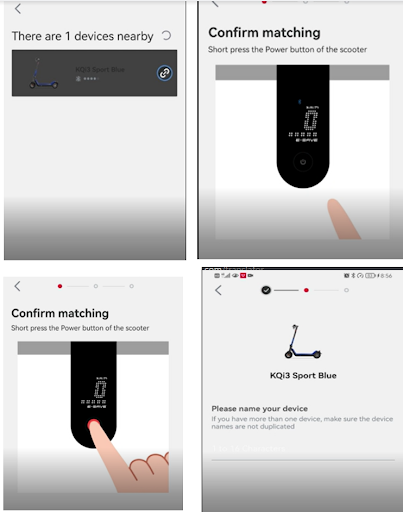
3. Select Bind with Bluetooth4. Follow the instructions in the App
You will know when your scooter is connected to the NIU App when you see your app like in the picture below:
Now that you have connected yourKQi3 to the NIU App, it’s time to activate your scooter
Recommendations
In case you encounter some problems connecting your kick scooter to the app like these:
1. Your NIU App cannot detect your kick scooter
2. You’re unable to bind the scooter because it was previously connected to the app
You may send an email to [email protected]. Please include your scooter details, SN or VIN (starts with 199–), proof of purchase, and screenshots of your app showing the problem so we can check.
Only one app account can be connected to a kick scooter.
Introduction
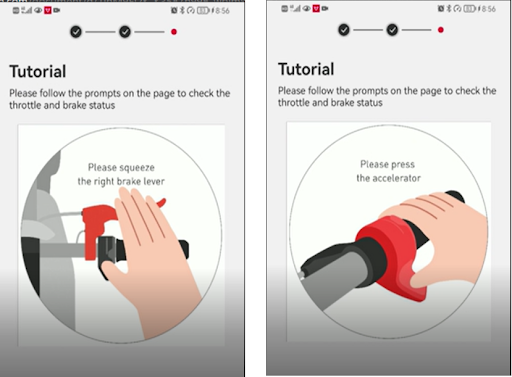
When you receive your kick scooter, the speed is limited. It won’t run the speed set to the scooter right away. So you have to activate it first before you get the normal riding speed.After the kick scooter is connected to the NIU App, you have to activate your kick scooter so you can reach the top speed set for your scooter.
Solution
Please follow the steps below:
1. You will be prompted to watch a tutorial video.
2. Be guided through a 2 km tutorial ride. During this tutorial ride, the speed of the kick scooter is limited.
3. When the tutorial ride is complete, the kick scooter will give an audible prompt.
4. Reset the thumb throttle and press it again, you can enter the normal riding mode.

Make sure that your phone is connected to the Internet and keep the screen on when trying to upgrade again.
You can apply for repair online: https://niu.besender.com/
Please check the following items:
1. Check if the folding latch has been correctly installed.
2. Check if the stem fastening screws are tight. Tighten the screws if needed.
3. Check if the fastening screws connecting the gooseneck and the stem are tight. Tighten the screws if needed.
Check if the front and rear wheel fastening screws (nuts) are loose. If they are, tighten the screws (nuts). If they are tightened, please contact after-sales service.
Stalling is most likely to be caused by a damaged controller. Please contact the after-sales service for repair.
If the taillight does not light up, the taillight or the controller may be faulty. Please contact the after-sales service for repair.
1. Press the locking latch button upward. While holding the handlebar with one hand, press the safety latch all the way down. Connect the folding hook to the latch on the rear fender to fold the kick scooter.
2. Press the lock plate button on the rear fender and lift the folding stem so that the folding latch snaps (until a click is heard), press the folding latch upward with force (until a click is heard) to unfold the kick scooter.
When the handlebar tube becomes loose, observe and decide if the handlebar locking cover is loose. Tighten the handlebar locking cover screws if needed. If the handlebar is still loose after tightening the locking cover, please contact after-sales service for repair.
The rattles are generally caused by loose parts, friction, or vibration.You can get off the kick scooter and push it forward to determine where the rattling is coming from. If the rattles are caused by loose screws, please tighten the screws. If you cannot determine the problem, please contact the after-sales service for repair.
If the thumb throttle is not bouncing back, you can check if there is enough space between the throttle and the handle grip. If there is not, you should adjust the position of the thumb throttle or the handle grip so that there is a proper gap between them.
Also, check if the thumb throttle set screws are loose enough. If they are too tight, the thumb throttle can easily get stuck. If these actions still don’t resolve the problem, please contact the after-sales service for repair.
You can check if there is anything stuck in the brake handle. Remove any dirt or small parts which are stuck there. If the brake handle doesn’t bounce back due to a mechanical defect, it will have to be replaced. Contact after-sales service for repair.
If the headlight is dim or uneven or not working at all, please check whether there is dust or water in the light hood.If there is, contact after-sales service for repair.If there is not, please try to press the power button twice to toggle the headlight switch. When switching the light mode does not resolve the problem, contact after-sales service for repair.
The NIU kick scooter uses both mechanical and electronic brakes.If you’re experiencing issues with the brakes, please firstly check the mechanical brakes.
Hold the brake on one side and try to push the kick scooter forward. If you are easily able to move the kick scooter, the brakes are not properly working. You should adjust the brake cable fastening position in order to adjust the brake tension.
If, after adjusting the mechanical brakes, the brakes are still faulty, the problem most likely is caused by the electronic brakes. In that case, please contact after-sales service for repair.
If the battery doesn’t charge anymore, please check and make sure the charging port is clean. The charging problem can also be caused by the charger itself. Plug the charger in but keep it disconnected from the kick scooter. Check if the charger indicator is green. If it is red or not lit at all, the charger may be damaged.In this situation, contact after-sales service for repair.
You can check if the power button has moved or if it got stuck. If so, you can try to move it back to its correct position and check if the display can work again. If the dashboard remains faulty, contact after-sales service for repair.
If you are using the kick scooter for the first time, please make sure you followed the steps as explained here How do I activate the NIU kick scooter?
If you have completed the activation process and you’re still not able to ride the scooter, please contact after-sales service for repair
If your kick scooter has troubles, an error code will appear on the dashboard.You can refer to the Troubleshooting chapter in the user manual to determine what is wrong with your kick scooter. Follow the recommended troubleshooting instructions or contact after-sales service for repair.
If your kick scooter is new, the brakes will loosen and become smoother after a short period of time. You can also adjust the “energy recovery” settings in the app. When setting it to “weak”, the electronic brake system will be smoother.
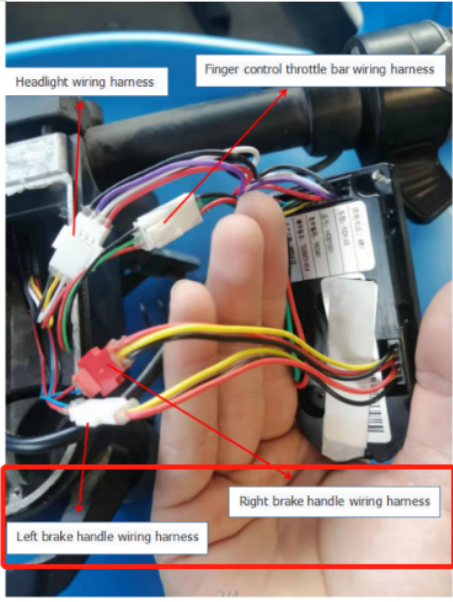
There might be an instance where an error code will appear on your dashboard. And one of these is Error 02. It refers to a brake fault.
Please check the state of the accelerator switch to see if the brake cables are plugged in tightly.
1. Left brake handle wiring harness
2. Right brake handle wiring harness
If it still doesn’t work, please submit the form that can be filled out online. Our after-sales team will get in touch with you with the instructions.
There might be an instance where an error code will appear on your dashboard.
And of these is Error 03. It refers to an accelerator fault.
Please check the state of the accelerator switch to see if the cables are plugged in tightly.
1. Finger control throttle bar wiring harness
If it still doesn’t work, please submit the form that can be filled out online. Our after-sales team will get in touch with you with the instructions.
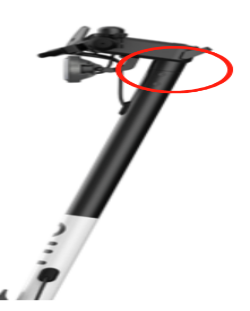
There are instances when the kick scooter won’t turn on the first time using it. This happens when some cables are disconnected.
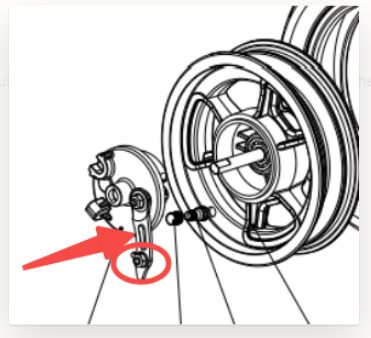
Please check the two cables as shown in the photo below to see if they are connected properly:

You can find these cables in the stem.
If it still doesn’t work, please submit the form that can be filled out online. Our after-sales team will get in touch with you with the instructions.
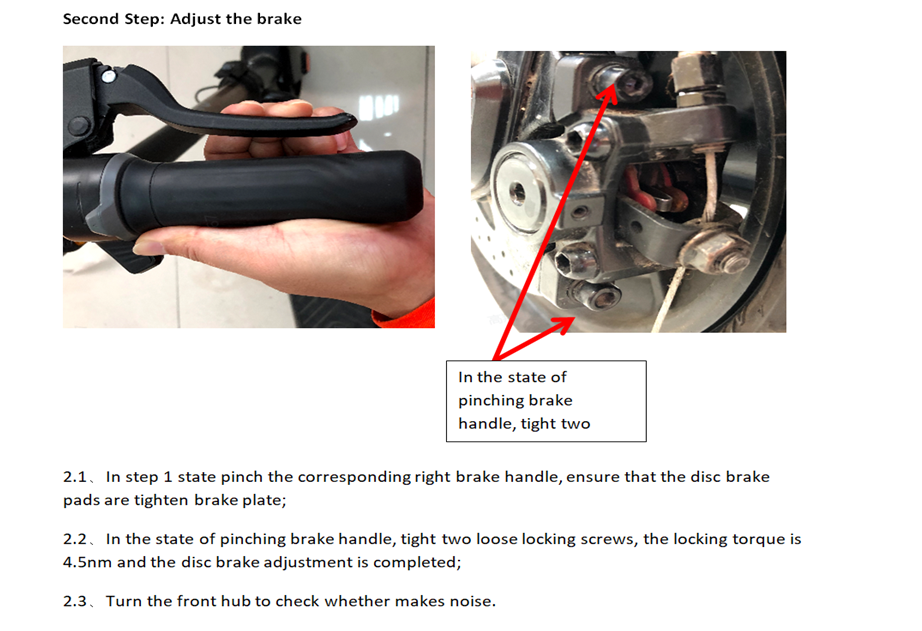
There will be an instance when you hear a brake disc noise on your kick scooter the first time using it.Below are the steps you can follow to fix the problem.
Please check the state of the brake disc plate. If it's normal, please follow the steps below:
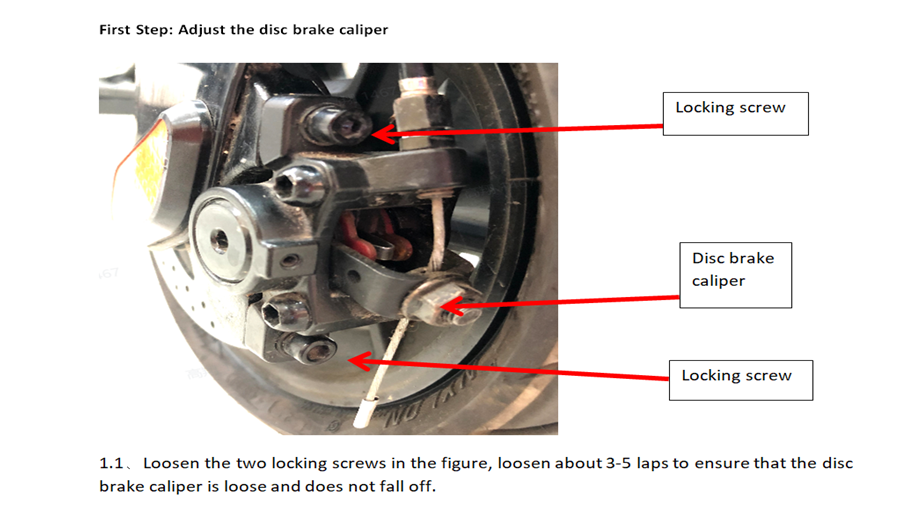
The first step: Adjust the disc brake caliper.
1. Loosen the two locking screws in the picture, about 3-5 turns, to ensure that the disc brake caliper is loose and does not come off.
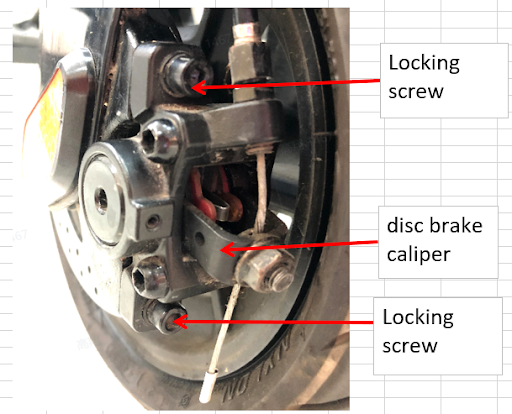
The second step: adjust the brake
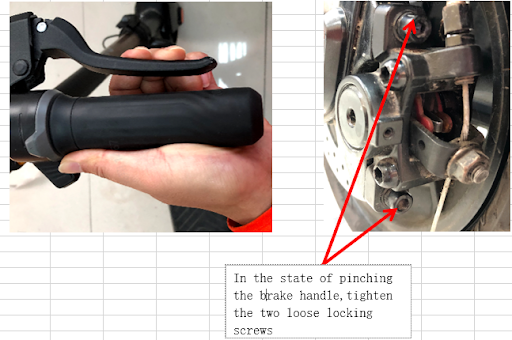
2.1. Pinch the corresponding right brake handle in step 1 to ensure that the disc brake pads are fastened to the brake plate.
2.2. In the state of holding the brake handle, tighten the two loose locking screws, the locking torque is 4.5nm, and the adjustment of the disc brake is completed.
2.3. Rotate the front hub to check if there is any noise.
If it still doesn’t work, please submit the form that can be filled out online.Our after-sales team will get in touch with you with the instructions.
In case you see there's an error code 03 on your dashboard and you've checked and followed the instructions here. You received an email from our after-sales team saying that you will need to ship the whole scooter to our maintenance point. But you don't want to because you no longer have the box or you want your scooter safe from any shipping damage.
You can send the part that needs repair, which is the forehead body of your kick scooter.
Please follow the steps below:

When there's an issue with your kick scooter, always check first your user manual for troubleshooting. If you have followed the instructions in the manual and the problem persists, you can now send an email to [email protected].
In case you are advised to fill out the form, there are instances where it cannot be submitted due to an error. If you encounter this, please send us the necessary details below so we can submit the form for you.
Customer name:
Country:
City:
Address
Zip code:
State:
Email:
Tel:
VIN: (starting with 199--)
Issue:
Please include pictures of your kick scooter showing the problem. Once we are able to submit the form for you, our after-sales team will contact you with instructions.Please keep an eye on your email
You may encounter this red warning sign, error 42 after unplugging your kick scooter from power.
Error 42 refers to battery communication fault and verification failure. Please limit the speed to 6km/h.
If it still doesn’t work, please submit the form that can be filled out online. Our after-sales team will get in touch with you with the instructions.
There are instances where you haven't turned on your kick scooter for a while, like for several weeks or months, and you haven't charged it before using it again. When you turn it on, a red warning sign error 41 appears on your dashboard.
This error refers to a battery over-discharging warning. Please charge your kick scooter immediately.
If it still doesn’t work, please submit the form that can be filled out online. Our after-sales team will get in touch with you with the instructions.
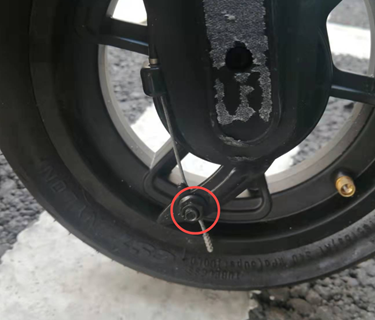
The KQi2 kick scooter uses a drum brake and it is very easy to fix. Please loose the nut (red mark in the figure) and adjust the swing arm (indicated by the arrow) to adjust the tightness of the brake line.
If it still doesn’t work, please submit the form that can be filled out online. Our after-sales team will get in touch with you with the instructions.
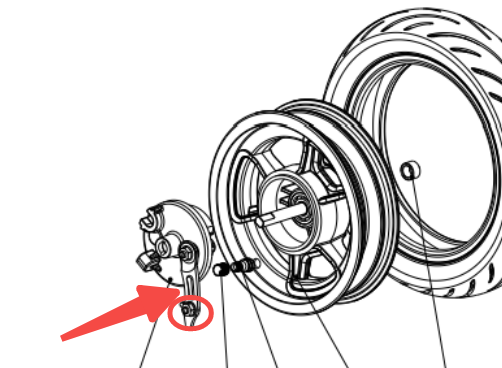
When you hear rattling or scratching sound from the front tire of the kick scooter, please check if the disc brake is deformed.
If not, please follow the steps below:
If it still doesn’t work, please submit the form that can be filled out online. Our after-sales team will get in touch with you with the instructions.
If you hear a rubbing noise from the front wheel, the brake line may be too tight. The KQi2 kick scooter uses drum brake and only has front mechanical brake. Adjusting the brake is very easy using the steps below:
1. Loosen the screws fixing the front brake cable.
2. Adjust rocker arm position. The more upward the rocker arm, the tighter the brake. The lower the rocker arm, the looser the brake.
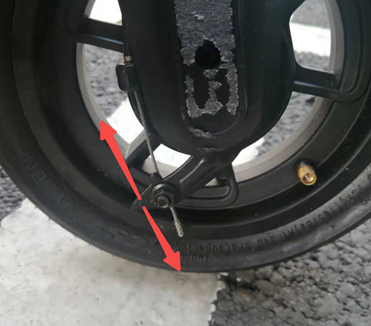
3. Tighten the screws for fixing the front brake line.
In addition, the electronic brake can be adjusted by adjusting the energy recovery intensity through app. You may choose between the three grades: strong, week and medium.

If it still doesn’t work, please submit the form that can be filled out online. Our after-sales team will get in touch with you with the instructions.
If you noticed that the brake for your KQi2 Pro is not as fast as before and you have to press the brake all the way down, you will need to check or fix the brakes for your kick scooter.
The KQi2 Pro uses a drum brake and does not need adjustment. It is normal to make a noise during braking because the braking prevents the wheels from rotating through friction. But it is not normal for the wheels to make noise when they rotate normally.
If the brake is too loose, please loosen the screws (red circle in the figure) and adjust the swing arm (red arrow) to adjust the tightness of the brake line.
If it still doesn’t work, please submit the form that can be filled out online. Our after-sales team will get in touch with you with the instructions.
A red dot may show on your KQi kick scooter's dashboard. When you see this red dot, it's best to send your scooter to our maintenance point so we can check.

Please submit the form that can be filled out online.Our after-sales team will get in touch with you with the instructions.
You may wonder why you are still stuck in e-save mode even after binding and activating your kick scooter to the app.
When you see the e-save indicator flashing on your scooter's screen and you can't switch gears, it means that your scooter is in custom mode. If you manually set a top speed in the NIU app, it will blink the E-Save on the scooter.
You will need to enter the NIU App and turn off custom mode. Only then can you switch gears and use the sport mode for your kick scooter.
You cart is currently empty
Sign up to receive exclusive offers and the latest news about our products.
We promise not to spam. Just awesome savings and cool content.